

K so, I love Pinterest. Yeah, I know, what a Millenial thing to say, but I like what I like, and when I saw this Indian Inlay table, it looked so beautiful and boho, I wanted one.
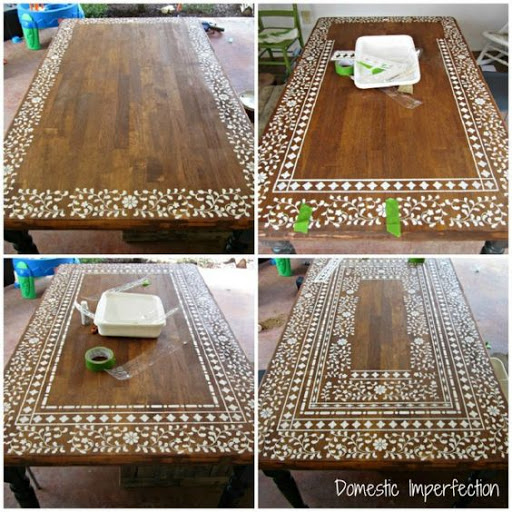
See?
Now. Someone had to make this table, right? If they can, why couldn’t I? I thought it was something I could replicate on a sad Ikea table frame the art teacher at my school was throwing out.

If you could even call this a table
If you look really close, you might spot the fact that it lacks an actual table top, you know, the thing that makes it a legit table. Fortunately, I live with a General Contractor, who had this piece in the scrap pile for a while, so I got a free table top (but I had to work for it).
I got this pic from my roommate’s SnapChat
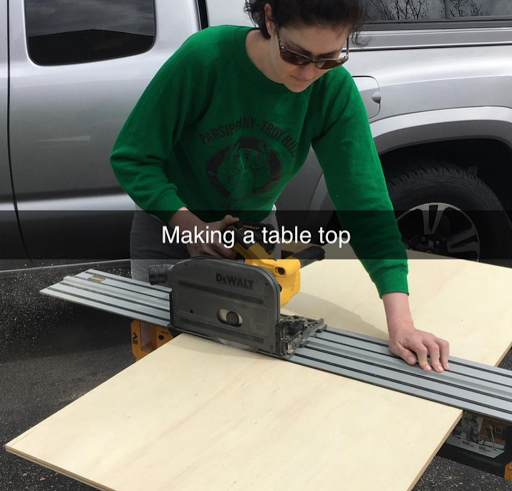
Making a table top seems intimidating, but really, if I can do it, you can too. Here are the steps:
- Measure the length and width inside of the table frame (since the wood will have to sit inside the frame, and not on top)
- Go to home depot and ask for a piece of scrap plywood. Explain that you are trying to make a table top.
- IF YOU OWN A CIRCULAR SAW AND KNOW HOW TO USE IT: Measure the table frame, transfer the measurements to your wood, and cut it out. Pop it in your frame to make sure it fits properly before going any further!
- IF YOU OWN A CIRCULAR SAW AND DO NOT KNOW HOW TO USE IT: It seems daunting to wield a fast, scary, rapidly spinning blade covered in body-part-severing teeth, but you absolutely can do it. Especially if you are female. The females are strong as hell. Here’s a YouTube video to will walk you through it: https://youtu.be/4jpOYxRyTFY . Not only will you have a new tabletop, but a new skill! Learning something new is a great feeling, and as a bonus, you will impress everyone who assumes you’re more decorative than useful.
- IF YOU DO NOT OWN A CIRCULAR SAW: The great people of Home Depot will cut it to size for you, which is just awesome. Just bring your measurements, or even your table frame, and they will help you out.
Now that the hard part is out of the way, stain that thing! To mimic my inspiration, and to make the white decorations I’m going to paint on later really *pop*, I went with a darker stain that I found in the basement. I’m not sure what the name of the stain was, unfortunately, because I was just trying to use up what I have on hand rather than spend money.
I think it was called American Walnut
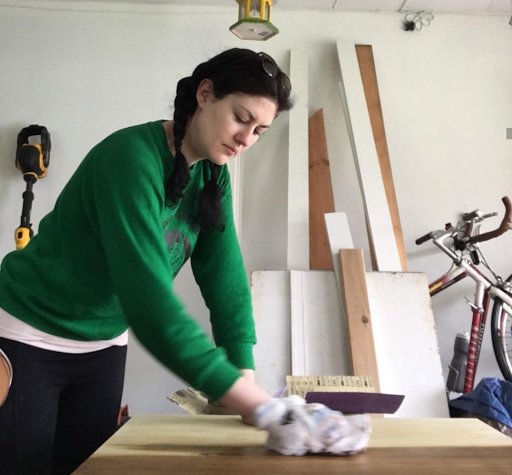
I didn’t manage to get a pic of me sandpapering the top, but I promise I did. Then I used a Swiffer wipe to get rid of all the dust on top so my stain would go on evenly. I did several coats of this stain, wearing gloves and using an old rag. I rubbed it on in the direction of the grain, making sure to wipe just a little bit past the edges of the wood, so that the ends wouldn’t have weird extra stainage.
Once the stain had set overnight, it was time to paint the details! Full discloser, I messed up the first time, so I had to flip it over and stain the back so it would be the new front. Accidents happen, but in the long run, they’re not as big as deal as you (or I) think.

Mkay, thanks Tim
Now to decorate! I have acrylic paint on hand because I sometimes get the wild hare to paint things…

Like this one I did back in February
Acrylic paint is great because the it’s color-fast (painters will know that oils dry darker and watercolors dry lighter than when they are first applied) and they dry quickly. Plus, I am impatient. I kept my phone open to my inspiration Pinterest page, and got to painting!

Still in my pajamas
I made some general outlines, and then filled them in, kind of like my own little paint-by-number. Since the inspiration piece was so visually jam packed, I figured as long as I filled up the space, none of the flowers had to be perfect, or identical, or even symmetrical. I did this also to prove to myself that perfectionism is not healthy, and I am a recovering perfectionist.

I didn’t care for Of Mice and Men, by I do like this
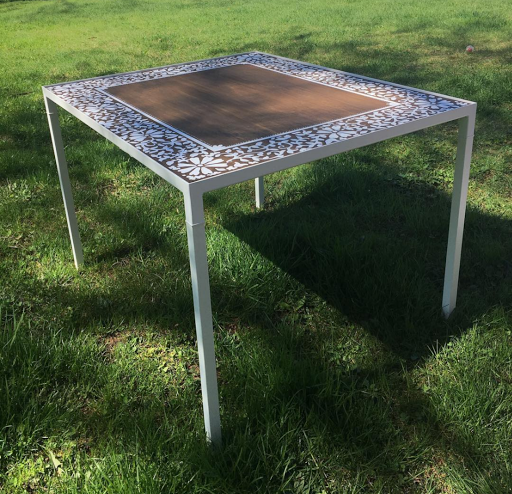
The last thing I did was to seal the table with resin. Resin is expensive and it sets VERY quickly, so I only did one layer. It really amped up the overall look when I was done… And here’s the finished piece!
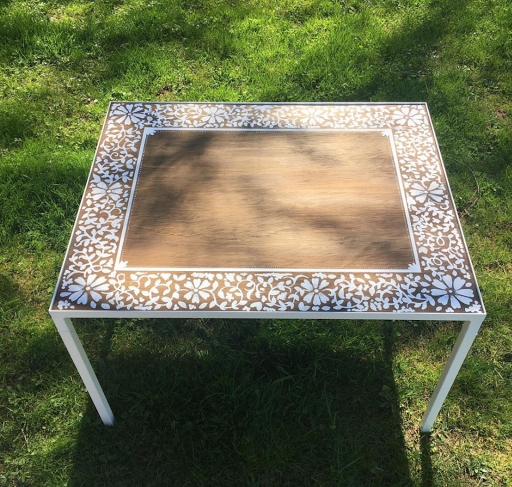
Tada!
As someone who is so rarely pleased with anything I’ve made (again, recovering perfectionist), I was actually really glad about how this turned out. Considering the table frame, wood, stain, and white paint were on hand, I really only paid $20 for the resin (and that was with a Michael’s 20% off and my teacher’s discount).
Now she’s posing for the camera
Here’s my lovely table in my den, doing what a table oughta do, by holding up a spider plant my neighbor gave me, a serving tray I got from Goodwill a while back, and two coasters that I found in a garbage pile, cleaned up, and painted. And the laissez-faire approach to painting turned out much better than I expected!

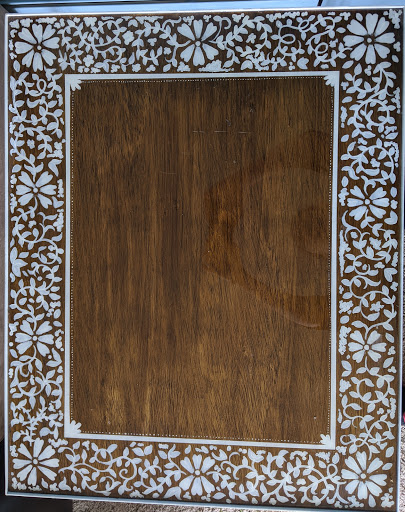
Here’s a close up:
Can you see me?
So that’s it! Whaddya think? Do you have anything you have/you’d like to revamp? Let me know!
